3.1. Create Your New Project

Fig. 3.2 Create New Project
When you create a new project in OP, there are a number of required fields to fill in, marked with an asterisk (*). The fields are explained below:
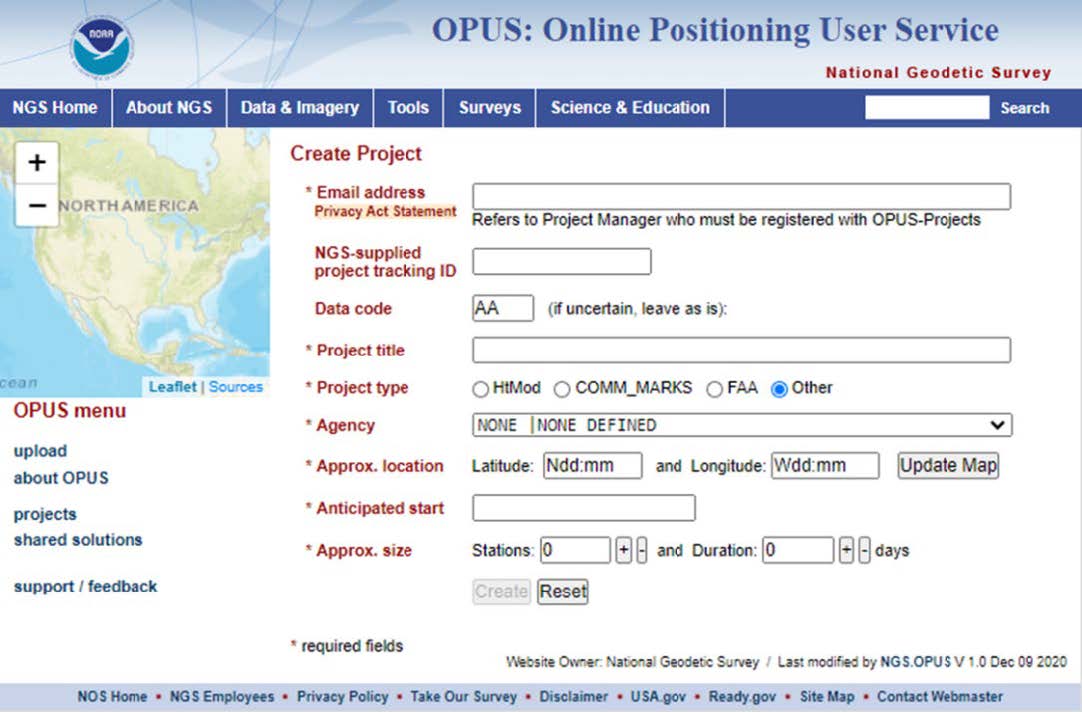
Fig. 3.3 * Fields, Information to Enter
Email address (required): Enter the email address used when you registered for OPUS Projects for Managers training.
NGS-supplied Project Tracking ID (optional; required for submission for submission to NGS): If your intent is to submit your data to NGS, you will need to have an official NGS Project Tracking ID. Tracking IDs are issued through the Survey Project Proposal page (Section 2). It is recommended that you submit a survey proposal even if you are unsure whether you will submit the project to NGS, as this will result in a professional review of your project plan. Note that the tracking ID can be entered into OP at any point. If you do not intend to submit your data to NGS, but you want to unlock the advanced features, “0000” may be entered as a dummy ID in the field upon creation of the project. The “dummy” ID enables all the same features as with an official NGS Project Tracking ID, minus the ability to submit the project to NGS.
Caution
If you do not include a Project Tracking ID (or dummy ID), the advanced features of OP4.0 will not become available
Tip
If you have not originally entered a valid NGS Project Tracking ID or the “dummy” ID, you can always add the ID to the project at a later date from the Manager’s Page.
Data code (optional): This user-specified code can be used to identify different parts of a project that all fall under the same Project Tracking ID.
Tip
If a valid NGS Project Tracking ID has been associated with the project, the following fields will be automatically filled; otherwise, the user may complete the fields manually
Project title (required): Enter a short descriptive name for your project (e.g. West Side Densification Survey).
Project type (required): The options are: Height Mod, COMM_MARKS, FAA, or “Other.” This item is used only for internal tracking of Height Modernization, NGS Commemorative Marks, and the Federal Aviation Administration’s Aeronautical Survey Program projects. No specific choice will have any impact on your project. For more information on these project types, see the Survey Proposal Page. Most users will simply accept the default choice of OTHER.
Agency (required): This identifies the category and name for the agency submitting the project. If you have already identified a NGS Project Tracking ID, the Agency field will be automatically filled with the agency identified in the project proposal. If no Project Tracking ID was identified, or you used the dummy tracking ID “0000,” then this field must be filled out manually by selecting the appropriate registered agency. The easiest way to proceed is to begin typing the agency code in the text box: the appropriate code should appear from the drop-down menu. If you are an individual, or do not want your work to be associated with an agency, you can keep the default value “NONE | NONE DEFINED.” If you would like to request an agency code, please contact ngs.annexc@noaa.gov to have an agency code assigned.
Approximate location (required): You can enter the approximate coordinates for the center of your project (to the nearest minute of latitude and longitude) or you can click on the map in the upper left-hand corner of the page to identify the approximate survey location. Clicking on the map will auto-fill the Latitude and Longitude fields on the page.

Fig. 3.4 Click Map
Anticipated start (required): Click in the box to open a calendar, and select the anticipated start date for your project.
Approximate size (required): Enter the estimated number of user marks to be observed in your project, as well as the estimated number of days your project will last.
For projects to be submitted to NGS, the project must contain at a minimum two-2 hours sessions for all stations.

Fig. 3.5 Create Project
When all required fields have been entered, the create button will become active. When clicked, the project will be created.